
How to Apply and Remove Cushion Grip Denture Adhesive
Share
FIRST-TIME USERS: HERE'S WHAT YOU NEED TO KNOW
Cushion Grip is not a glue adhesive; it adheres to dentures, not gum. It replaces the need for glues, powders, or creams by acting like a soft reline, filling gaps to ensure a secure, stable fit.
- With proper use, it creates a suction seal for a snug, comfortable fit that lasts up to four days per application.
- The quantity needed to secure your dentures properly is based on how loose your denture is. Start with a smaller application and add more if needed.
- When applied, you might feel a brief tingling sensation, like mouthwash, lasting no more than 5 minutes. This is normal due to the small amount of alcohol in Cushion Grip. Avoid use if you have open sores or cuts; wait until your gums have healed.
- IMPORTANT: Cushion Grip is not suitable for ill-fitting or broken dentures, nor does it adhere well to dentures with very smooth surfaces, silicone, or metal dentures.
- WARNING: If you experience an allergic reaction, discontinue use immediately. For more information about the product, please review the Cushion Grip Safety Data Sheet HERE
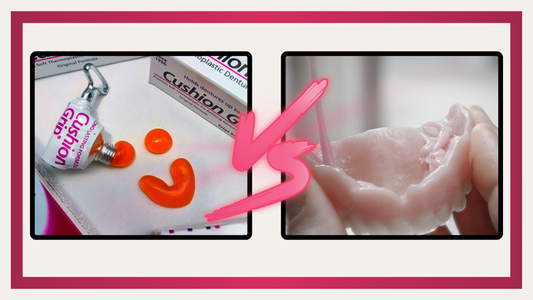
How to Apply Cushion Grip Denture Adhesive:
1. Warm
As a thermoplastic denture adhesive, Cushion Grip softens and becomes pliable when heated.
Warm the capped tube in a glass of hot tap water (not boiling) for 5 minutes with the cap facing downward. This softens Cushion Grip, making it easier to dispense. If dispensing remains difficult, soak for a few extra minutes.
2. Dispense

When it gets pliable in the tube, attach the (enclosed) slotted key to the end of the tube. Then turn the key to carefully squeeze a ball of Cushion Grip that is about the size of a nickel or 3/4 inch in diameter, per plate.
[Tip: The quantity needed to secure your dentures properly is based on how loose your denture is. Start off with smaller applications and build up if necessary.]
Tips and Tricks for Cushion Grip
Tips for Easier Dispensing From the Tube
3. Apply to Lower Denture First (If You Have Both Upper and Lower Dentures)
Ensure that both your hands and the lower denture are clean and completely dry before applying. Any moisture can cause the adhesive to lift. Also, make sure to perform this step while wearing your top denture, but without applying Cushion Grip to it yet.
Video Tutorial for Applying Cushion Grip
Begin by molding the Cushion Grip into a rope-like shape by rubbing it between your palms.
Gently place the rope-shaped Cushion Grip along the gum groove from one end to the other. Spread it into a thin, even layer over the required area and press it firmly onto the plate.
Let it set for 5 minutes. Then, insert your lower denture and bite down firmly for 30 seconds to 1 minute to secure it in place.
[Tip: Apply the adhesive in small amounts and near the gum groove area for the best results.]

Apply to the Upper Denture: Repeat the procedure by forming a Cushion Grip ball into a rope shape by rubbing it between your palms. Gently press it into the gum groove and spread it evenly across all necessary areas from end to end.
Let it set for 5 minutes. Then, insert the upper dentures by pressing them against the front gums. Use your thumb to firmly press the roof of the mouth upward. Complete the suction seal by biting down firmly for 30 seconds to 1 minute.
[Disclaimer: Begin by applying Cushion Grip in the trough/gum groove only. If your denture remains very loose, apply a thin layer over the palate as needed.]
[Tip: Always apply the denture adhesive in small amounts and near the gum groove area for best results.]
Continue wearing your dentures for 2-6 hours to allow the adhesive to cure/set. Avoid removing them, eating, or drinking for the first 2 hours. The longer you keep them in, the better the adhesive will set. You can sip liquids, but avoid holding them in your mouth and steer clear of hot liquids initially.
Do not soak or use other denture adhesives for the first 24 hours after applying Cushion Grip. After that, you can clean and soak your dentures as usual and use other products like denture adhesive or powder for added security. Cushion Grip will not wash off or break down in water.
Tips and Tricks for Using Cushion Grip
[Apply Before Going to Bed]
[Tip: Our brand ambassadors like to apply it at night so Cushion Grip can cure the whole night uninterrupted in their mouth.]
The Excess Cushion Grip Offers a Strong Suction Seal
Tip: Excess Cushion Grip creates a strong suction seal. If there's too much, remove your denture after two hours, trim the excess, and reinsert it for a better fit.
How to Remove Cushion Grip Thermoplastic Denture Adhesive:
If, after a few days, you feel the need for a stronger seal, remove the old Cushion Grip and apply a fresh coat. It's recommended to replace Cushion Grip on your dentures at least once a week for optimal fit.
Do not attempt to remove Cushion Grip until it is fully cured and has turned a lighter orange/peach color. If any orange remnants remain, soak your dentures in iced water for a couple of hours until it turns peach, indicating it's fully cured.
1. Soak First
Soak your denture plates in hot tap water (NOT boiling) for 10 minutes to soften the old Cushion Grip application.
2. Peel Away
To remove, gently peel the softened Cushion Grip adhesive from the dentures using your fingers or tweezers.
You can use the methods recommended by our Brand Ambassadors if you're having trouble removing Cushion Grip:
Method 1: Run warm water over your denture. Grab a small piece at the end and gently pull up while holding the running water between the Cushion Grip and your denture. It should come off in one piece.
Method 2: Lift the edges all around the denture and find an area where you can get a good grip. Gently peel it off, similar to removing a price tag sticker. If needed, use your finger to separate it by lifting and reaching underneath. You can also use tweezers to assist in lifting in areas where your fingers may have difficulty reaching.
Video Tutorial for Cushion Grip Removal [Method 2]
----------------------------------
First-Time Users: Ask for a Brand Ambassador
If you are having any difficulty applying or removing Cushion Grip, please reach out to us via forms and consult our Brand Ambassador for any help in understanding how to apply and remove Cushion Grip.
20 comments
I’ve had dentures for a few years and lately I’ve noticed a looser fit on the bottom due to deterioration so I gave Cushion Grip a try and I am SO grateful I did. I think this product has made my dentures more comfortable than they have ever been and it feels so natural. I will never be without it again. Super easy to use if you follow the directions. The biggest help is to make sure you allow the recommended time for it to cure after you put your denture in. The cure time, without interruption, is the trick.
Hello Michael,
I hope all is well. I wanted to let you know that you can use Cushion Grip on your set of permanent dentures and it will not do any harm. I hope this helps. If you need any further assistance, please let me know. Have a blessed and beautiful day.
First timer ! I have had dentures almost 10 years….And I hate them. They didn’t fit when I first got, and still do not. SO this was a huge hope – and let me tell you, get it, and use it. Very easy to do. This is the first time I have had both upper and lower in and everything feel secure. Now to relearn to speak well with everything in my mouth….It does have that mouth wash tingle, lasts exactly 1 min at least for me….I have a pretty smile I haven’t seen in awhile….
Can I use this on my permanent set of dentures? Or is it only meant for your immediate/ temporary dentures?
Hello Mary
You can clean your dentures as often as you would like when using Cushion Grip, and it will not harm your denture. There are no restrictions on how often you can clean them or the choice of denture cleaner (Our Brand Ambassador has reported that she just tried about all of them with Cushion Grip ) . However, it’s important to wait for 24 hours after the initial application of Cushion Grip before soaking, scrubbing, using adhesive, or most importantly removing the Cushion Grip
The reaction Kristy experienced may have been due to removing the Cushion Grip before it was properly cured. It’s crucial to allow the recommended curing time to ensure its effectiveness and allow it to set/harden by following the instructions and waiting for the appropriate duration, you can avoid any destructive effects to the inside of your dentures.